
2) First open the SQL Server management studio.
3) Create your new database named it as "TMP_FBA".
4) Now locate the below path to create a new sql membership tables.
("C:\Windows\Microsoft.NET\Framework64\v2.0.50727")
5) Find the aspnet_regsql.exe and run it to create new tables to store the FBA Users.
6) So when this exe will run the number of tables will created as shown in screen shots.

8) Open the web.config file for the new asp.net website.
9) Find the "connectionStrings" tag and replace it with the below line of tags.It will add the connection string path and the configuration of the Membership provider and role provider as shown in Screen Shot.
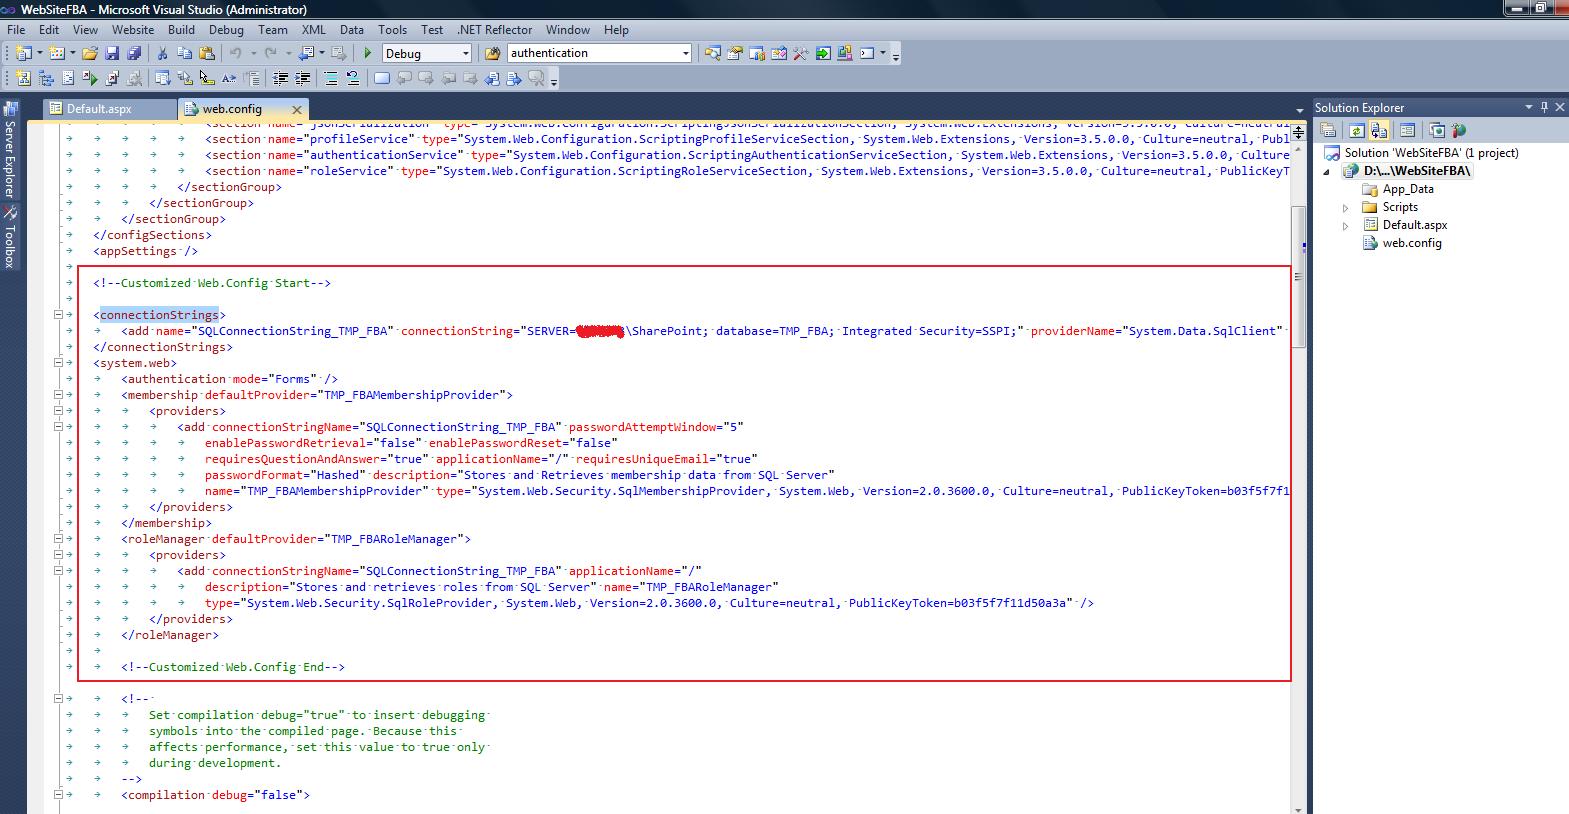
10) I have added my customized tag inside the
<!--Customized Web.Config Start-->
My Customiztion....
<!--Customized Web.Config Start-->
So new tags in asp.net websites are
<!--Customized Web.Config Start-->
<connectionStrings>
<add name="SQLConnectionString_TMP_FBA" connectionString="SERVER=YourServer\SharePoint; database=TMP_FBA; Integrated Security=SSPI;" providerName="System.Data.SqlClient" />
</connectionStrings>
<system.web>
<authentication mode="Forms" />
<membership defaultProvider="TMP_FBAMembershipProvider">
<providers>
<add connectionStringName="SQLConnectionString_TMP_FBA" passwordAttemptWindow="5"
enablePasswordRetrieval="false" enablePasswordReset="false"
requiresQuestionAndAnswer="true" applicationName="/" requiresUniqueEmail="true"
passwordFormat="Hashed" description="Stores and Retrieves membership data from SQL Server"
name="TMP_FBAMembershipProvider" type="System.Web.Security.SqlMembershipProvider, System.Web, Version=2.0.3600.0, Culture=neutral, PublicKeyToken=b03f5f7f11d50a3a" />
</providers>
</membership>
<roleManager defaultProvider="TMP_FBARoleManager">
<providers>
<add connectionStringName="SQLConnectionString_TMP_FBA" applicationName="/"
description="Stores and retrieves roles from SQL Server" name="TMP_FBARoleManager"
type="System.Web.Security.SqlRoleProvider, System.Web, Version=2.0.3600.0, Culture=neutral, PublicKeyToken=b03f5f7f11d50a3a" />
</providers>
</roleManager>
<!--Customized Web.Config End-->
11) Check the duplicate tag entries should not be exist.
12) Now open the Asp.net Administration site by click from the solution explorer for configure the membership provider and role provider as shown in screen shot.

13) Go to the Provider tag and Select the membership provider configured by the above config entry modification and select the second link named "Select a different provider for each feature (advanced)" for the Provider settings as shown in screen shot.

14) So select the membership provider as "TMP_FBAMembershipProvider" and role provider as "TMP_FBARoleManager".

15) Now go to the security tab of the asp.net administration site.Click on Create User link.
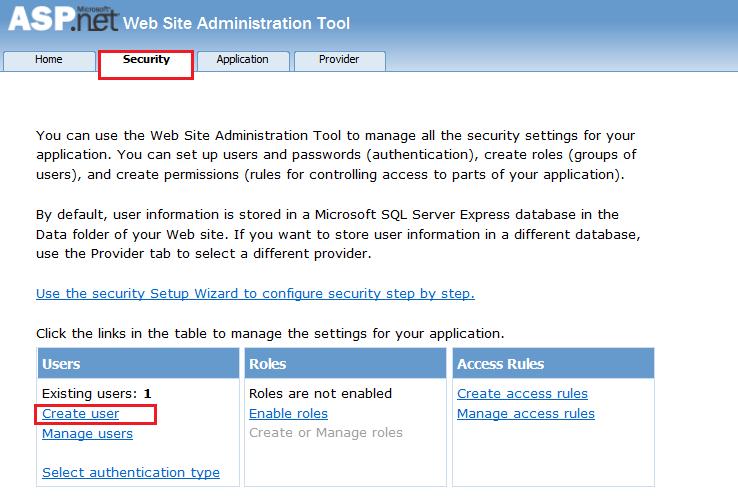
16) Create one user named fbatest1 and fillup the other details and Click the Button Create User.

17) Now check the user is added inside the newly created database by go to the sqlserver and select the Database "TMP_FBA" and select the table "dbo.aspnet_Users".

18) Once the User is added then create a new webapplication from the Central Admininstation site.
Go to the Appllication Management -> select Manage Web Appplication -> From the Ribbon click New.
19) Now One popup window will open then select the "Claim Based Authentication".

20) Now Enabled the FBA by check the box and add the provider details and click OK to create web new application

21) Now we need to change total three web.config files To enable the Form Bases Authentication,
a) In the the newly created web applications ,
b) In the Central Administration and
c) In the Security token site located at "%programfiles%\common files\Microsoft Shared\web server extensions\14\WebServices\SecurityToken"
22) First we will modify the web application web.config file
Open the web.config file of the Web Application and add the connection string as after the </SharePoint> tag as Shown in screen shot.

<!--Customized Web.Config Start-->
<connectionStrings>
<add name="SQLConnectionString_TMP_FBA" connectionString="SERVER=YourServer\SharePoint; database=TMP_FBA; Integrated Security=SSPI;" providerName="System.Data.SqlClient" />
</connectionStrings>
<!--Customized Web.Config Start-->
23) Now we will add the Membership and Role Provider tag in web.config file as shown in the screen shot

<membership defaultProvider="i">
<providers>
<add name="i" type="Microsoft.SharePoint.Administration.Claims.SPClaimsAuthMembershipProvider, Microsoft.SharePoint, Version=14.0.0.0, Culture=neutral, PublicKeyToken=71e9bce111e9429c" />
<!--Customized Web.Config Start-->
<add connectionStringName="SQLConnectionString_TMP_FBA" passwordAttemptWindow="5"
enablePasswordRetrieval="false" enablePasswordReset="false"
requiresQuestionAndAnswer="true" applicationName="/" requiresUniqueEmail="true"
passwordFormat="Hashed" description="Stores and Retrieves membership data from SQL Server"
name="TMP_FBAMembershipProvider" type="System.Web.Security.SqlMembershipProvider, System.Web, Version=2.0.3600.0, Culture=neutral, PublicKeyToken=b03f5f7f11d50a3a" />
<!--Customized Web.Config Start-->
</providers>
</membership>
<roleManager defaultProvider="c" enabled="true" cacheRolesInCookie="false">
<providers>
<add name="c" type="Microsoft.SharePoint.Administration.Claims.SPClaimsAuthRoleProvider, Microsoft.SharePoint, Version=14.0.0.0, Culture=neutral, PublicKeyToken=71e9bce111e9429c" />
<!--Customized Web.Config Start-->
<add connectionStringName="SQLConnectionString_TMP_FBA" applicationName="/"
description="Stores and retrieves roles from SQL Server" name="TMP_FBARoleManager"
type="System.Web.Security.SqlRoleProvider, System.Web, Version=2.0.3600.0, Culture=neutral, PublicKeyToken=b03f5f7f11d50a3a" />
<!--Customized Web.Config Start-->
</providers>
</roleManager>
24) Second we will modify the Central Administration web.config file
Open the web.config file of the Central Administration and add the connection string as after the </SharePoint> tag as Shown in screen shot.

<connectionStrings>
<add name="SQLConnectionString" connectionString="SERVER=YourServer\SharePoint; database=MukeshFBA; Integrated Security=SSPI;" providerName="System.Data.SqlClient" />
<!--Customized Web.Config Start-->
<add name="SQLConnectionString_TMP_FBA" connectionString="SERVER=YourServer\SharePoint; database=TMP_FBA; Integrated Security=SSPI;" providerName="System.Data.SqlClient" />
<!--Customized Web.Config End-->
</connectionStrings>
25) Now we will add the Membership and Role Provider tag in web.config file as shown in the screen shot

<membership>
<providers>
<add name="i" type="Microsoft.SharePoint.Administration.Claims.SPClaimsAuthMembershipProvider, Microsoft.SharePoint, Version=14.0.0.0, Culture=neutral, PublicKeyToken=71e9bce111e9429c" />
<!--Customized Web.Config Start-->
<add connectionStringName="SQLConnectionString_TMP_FBA" passwordAttemptWindow="5"
enablePasswordRetrieval="false" enablePasswordReset="false"
requiresQuestionAndAnswer="true" applicationName="/" requiresUniqueEmail="true"
passwordFormat="Hashed" description="Stores and Retrieves membership data from SQL Server"
name="SQLConnectionString_TMP_FBA" type="System.Web.Security.SqlMembershipProvider, System.Web, Version=2.0.3600.0, Culture=neutral, PublicKeyToken=b03f5f7f11d50a3a" />
<!--Customized Web.Config End-->
</providers>
</membership>
<roleManager>
<providers>
<add name="c" type="Microsoft.SharePoint.Administration.Claims.SPClaimsAuthRoleProvider, Microsoft.SharePoint, Version=14.0.0.0, Culture=neutral, PublicKeyToken=71e9bce111e9429c" />
<!--Customized Web.Config Start-->
<add connectionStringName="SQLConnectionString_TMP_FBA" applicationName="/"
description="Stores and retrieves roles from SQL Server" name="TMP_FBARoleManager"
type="System.Web.Security.SqlRoleProvider, System.Web, Version=2.0.3600.0, Culture=neutral, PublicKeyToken=b03f5f7f11d50a3a" />
<!--Customized Web.Config End-->
</providers>
</roleManager>
26) Third we will modify the Security Token web.config file from "%programfiles%\common files\Microsoft Shared\web server extensions\14\WebServices\SecurityToken" location
Open the web.config file of the Central Administration and add the connection string as after the </system.net> tag as Shown in screen shot.

<connectionStrings>
<add name="SQLConnectionString" connectionString="SERVER=YourServer\SharePoint; database=MukeshFBA; Integrated Security=SSPI;" providerName="System.Data.SqlClient" />
<!--Customized Web.Config Start-->
<add name="SQLConnectionString_TMP_FBA" connectionString="SERVER=YourServer\SharePoint; database=TMP_FBA; Integrated Security=SSPI;" providerName="System.Data.SqlClient" />
<!--Customized Web.Config End-->
</connectionStrings>
27) Now we will add the Membership and Role Provider tag in web.config file as shown in the screen shot

<system.web>
<membership defaultProvider="i">
<providers>
<add name="i" type="Microsoft.SharePoint.Administration.Claims.SPClaimsAuthMembershipProvider, Microsoft.SharePoint, Version=14.0.0.0, Culture=neutral, PublicKeyToken=71e9bce111e9429c" />
<!--Customized Web.Config Start-->
<add connectionStringName="SQLConnectionString_TMP_FBA" passwordAttemptWindow="5"
enablePasswordRetrieval="false" enablePasswordReset="false"
requiresQuestionAndAnswer="true" applicationName="/" requiresUniqueEmail="true"
passwordFormat="Hashed" description="Stores and Retrieves membership data from SQL Server"
name="TMP_FBAMembershipProvider" type="System.Web.Security.SqlMembershipProvider, System.Web, Version=2.0.3600.0, Culture=neutral, PublicKeyToken=b03f5f7f11d50a3a" />
<!--Customized Web.Config End-->
</providers>
</membership>
<roleManager defaultProvider="c" enabled="true" cacheRolesInCookie="false">
<providers>
<add name="c" type="Microsoft.SharePoint.Administration.Claims.SPClaimsAuthRoleProvider, Microsoft.SharePoint, Version=14.0.0.0, Culture=neutral, PublicKeyToken=71e9bce111e9429c" />
<!--Customized Web.Config Start-->
<add connectionStringName="SQLConnectionString_TMP_FBA" applicationName="/"
description="Stores and retrieves roles from SQL Server" name="TMP_FBARoleManager"
type="System.Web.Security.SqlRoleProvider, System.Web, Version=2.0.3600.0, Culture=neutral, PublicKeyToken=b03f5f7f11d50a3a" />
<!--Customized Web.Config End-->
</providers>
</roleManager>
</system.web>
28) Now once the modification in all the web.config file , Create one site collection
Open the newly created Site Collection then the below screen will appear

29) Now select the window Authentication , logged in with window credential to Add the FBA user to the Site Collection.
30) Now from the "Site Permissions" select the appropriate site collection group and add the FBA user.

31) Once the FBA user is added , sign out as a window authentication and from the sign in page select the "Form Authentication" from the dropdown and add the FBA user's credential.

32) That's it , You have configured the Form based authentication...